See below for recipe
History of San Francisco Sour Dough Bread
When the discovery of gold near Coloma, Calif., in 1848 ignited a massive influx of prospectors to the area from other regions of the United States, as well as Europe, Asia, and Australia, many arrived with little more than the clothes on their backs. Among the few prized possessions brought along for the journey were jars of sourdough starter—the mixture of fermented flour and water used to make bread without commercial yeast—that held the promise of a full belly. To thousands of hopeful (and hungry) miners who risked it all in pursuit of striking it rich, those jars of cultivated wild yeast represented a semblance of stability and a taste of home, even amid backbreaking work and an uncertain future. Legend has it that the miners even hugged their starters at night to keep the cultures warm and help them survive.
Sourdough starter served as a lifeline to which the miners literally clung. Due to the sudden population explosion, farms couldn’t keep up with the surge in demand, rendering affordable food an elusive commodity in many parts of the state. Moreover, the discovery of gold excited locals, too: As California’s farm workers left their agricultural jobs to pan for gold, farms that had once supported the state’s economy sat abandoned. Local food merchants, smelling opportunity as droves of miners rushed the goldfields, inflated prices on everything from fruit to flour: A single egg could command as much as $3 (more than $80 per egg in today’s dollars).
Suffice it to say, many merchants struck more riches than gold miners; after traveling thousands of arduous miles to stake their claim to wealth, most hopefuls in the mining camps ultimately made little money. Faced with limited funds and resources, the miners could extend a small amount of purchased flour by mixing it with sourdough starter—a more affordable solution than buying a fresh loaf of bread.
Sourdough starter was a way to turn something that was essentially shelf-stable into something that was a bit more delicious, but also more nutritious,” Josey Baker, founder of Josey Baker Bread in San Francisco, told me over the phone.
Perhaps because the move to California introduced new bacterial inhabitants into their starters, many miners found that their bread took on a sharper sourness than they were used to—a tang that has since become one of the defining traits of San Francisco’s renowned sourdough bread. As the city’s bread fame grew, a rumor circulated that the strain of bacteria (found in the starters’ wild yeasts) responsible for San Francisco sourdough’s distinctly tart flavor simply could not be produced anywhere else.
Though this has been disproved—the bacteria has since been found in sourdough loaves all over the world—Lactobacillus sanfranciscensis remains named after the City by the Bay, a nod to the era that cemented sourdough as part of San Francisco’s identity. The popular Bay Area chain Boudin Bakery actually got its start during the Gold Rush, later trademarking its signature loaf as “the Original San Francisco Sourdough.” All these years later, Boudin still makes its sourdough from a gold miner’s starter—though it was nearly destroyed in 1906, when a major earthquake forced an emergency evacuation: “Louise [Boudin, the bakery’s matriarch] grabbed a bucket of the original starter before running to safety,” writes Erica J. Peters in San Francisco: A Food Biography. “She instinctively protected the ‘mother dough,’ which linked Boudin’s bread back to its beginnings.”
Following the Gold Rush, other Bay Area bakeries, like Parisian and Larraburu Brothers, became renowned for their bread, serving sourdough to the city for decades before eventually closing their doors. Today, San Francisco sourdough lovers still have plenty to choose from, with Tartine, Semifreddi’s, Acme Bread Company, and more working to maintain the city’s bread reputation.
Nearly two centuries later, 2020 proved another period during which many pantry staples again became more expensive or difficult to obtain, though this time fueled by panic rather than the hardships of building a new life. When the pandemic became tangible to most Americans, grocery store shelves (particularly those holding flour and yeast) sat empty for several weeks in the wake of hoarders buying more shelf-stable goods than they needed. This snag in the supply chain meant businesses had to introduce purchase limits on certain items, and many shoppers left their local supermarkets without the goods they were searching for. During this period, sourdough starter once again emerged in mainstream popularity as an anchor in the turbulence, a way to create a staple food when the store-bought version wasn’t guaranteed.
Perhaps humans have an inherent desire to spend more time in the kitchen when day-to-day comforts become uncertain. Indeed, the emergence of sourdough bread as a staple during the Gold Rush, paired with the thousands of loaves of sourdough baked during the pandemic, imply that times of unease force us to reclaim the sense of assurance that comes from making key foods entirely from scratch.
After all, in San Francisco, the heart of sourdough continues to beat as strongly as ever, deeply embedded into the very fabric of the city. Perhaps, being born out of necessity is exactly why the city’s bread has so firmly stood the test of time.
Secrets to San Francisco Sourdough
Master Your Starter’s Peak: The single most important variable is using your starter at its absolute peak. After you feed it, watch it closely. It will rise, dome at the top, and then just begin to flatten slightly. That is the moment of maximum leavening power. Using it too early or too late can lead to a dense loaf.
The “Poke Test” is Your Best Friend: To know if your bulk fermentation is done, use the “poke test.” Lightly flour a finger and gently press it into the dough. If the indentation springs back immediately, it needs more time. It should spring back slowly and leave a slight indent. If it doesn’t spring back at all, it’s over-proofed.
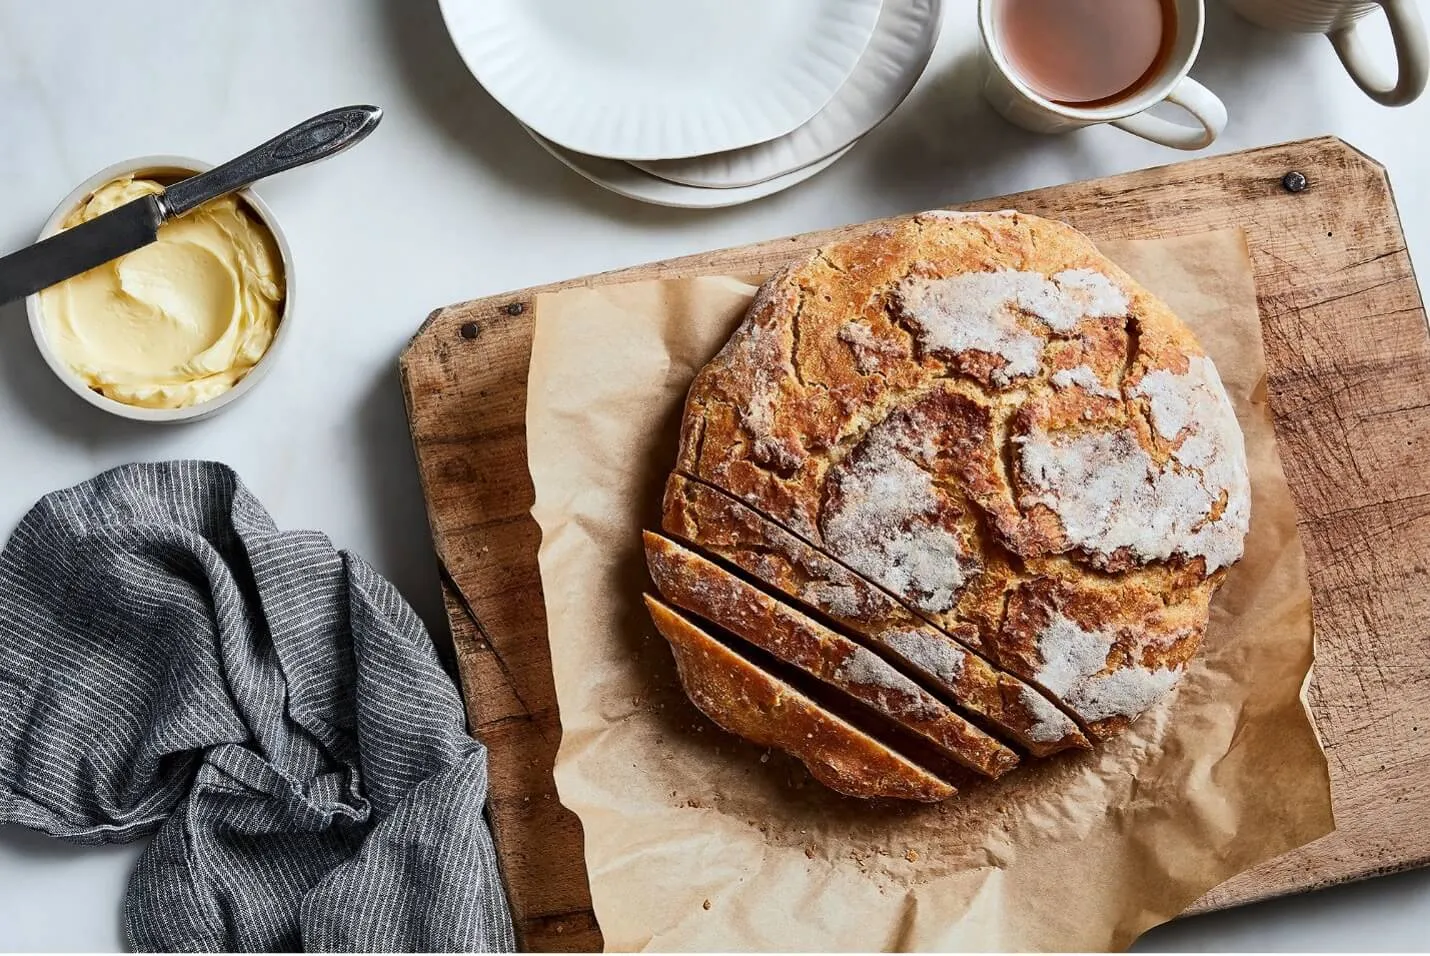
My Biggest Early Mistake: Fearing a Dark Crust. For years, I pulled my loaves out when they were just “golden.” The bread was good, but it lacked that deep, complex flavor. Don’t be afraid to bake your loaf until it’s a deep, rich, almost mahogany brown. That dark crust isn’t burnt; it’s caramelized, and that’s where so much of the flavor lives.
Boost the Tang with Whole Grains: For an even more pronounced sour flavor, try replacing 50g of the bread flour with 50g of whole wheat or rye flour. These flours ferment more quickly and encourage the bacteria that produce acetic and lactic acids, the sources of sourdough’s tang.
Proper Storage is Key: To keep that crust crispy, never store your sourdough in a plastic bag. Store it cut-side down on a cutting board for the first day. After that, keep it in a paper bag or a bread box. It will last for 3-4 days. To freeze, slice the completely cooled loaf, wrap it tightly in plastic wrap, and then in foil. It will keep for up to 3 months.
San Francisco Sour Dough Bread – Recipe
Adapted by JOHN COLETTA
Yields 10 servings
Ingredients
- 500g Flour; Bread; Organic
- 375g Water; Warm (27-29°C); Filtered or Mineral
- 100g Active; Bubbly Sourdough Starter; Organic (100% hydration)
- 10g Salt; Sea; Fine Grind
- 50g. Semola Rimacinata di Grano Duro (For Dusting)
A Note on Ingredients: Your final loaf is only as good as what you put into it. Use a strong bread flour with a high protein content of at least 12.5% for the best chew and structure. Ensure your sourdough starter is “active and bubbly”—meaning you fed it 4-6 hours prior, and it has at least doubled in size and is full of air. This is the engine of your bread. Finally, use filtered or non-chlorinated water, as chlorine can inhibit the wild yeast activity.
Instructions
- Autolyse (The Hydration Rest): In a large mixing bowl, combine the 500g of bread flour and 375g of warm water. Mix with your hands or a spatula until no dry flour remains. The dough will be shaggy. Cover the bowl and let it rest for 1 hour. This step, called autolyse, hydrates the flour and begins gluten development without any kneading.
- Mix in Starter and Salt: Add the 100g of active sourdough starter to the top of the dough. Dimple it in with wet fingers. Let it sit for a moment, then work it into the dough by pinching and squeezing until fully incorporated. Let the dough rest for another 20 minutes. Now, sprinkle the 10g of sea salt over the dough and repeat the pinching and squeezing process to incorporate the salt.
- Bulk Fermentation (Strength & Flavor Building): This stage will take about 4-5 hours at a room temperature of 24°C. During this time, you will perform a series of “stretch and folds.” For the first fold, with wet hands, grab the underside of the dough from one side, stretch it up, and fold it over the top. Rotate the bowl a quarter turn and repeat three more times. Cover and rest for 30 minutes. Repeat this stretch and fold process 3 more times, every 30 minutes. After the fourth set, let the dough rest, covered, for the remainder of the bulk fermentation, until it has risen by about 50% and feels airy and alive.
- Shaping the Loaf: Gently scrape the dough out of the bowl onto a lightly floured work surface. Be careful not to deflate it too much. Gently press the dough into a rough rectangle. Fold the bottom third up and the top third down, like a letter. Then, starting from the top, roll the dough down into a tight log, creating surface tension. Pinch the seam closed. Let it rest on the counter, seam-side down, for 15-20 minutes.
- Final Shape & Cold Proof (The Flavor Secret): Lightly flour the top of your dough. Flip it over so the seam side is up. Repeat the letter fold and roll it up again into a tight boule (round) or batard (oval). Place the shaped loaf, seam-side up, into a heavily floured banneton or a bowl lined with a floured tea towel. Cover it with a plastic bag and place it immediately into the refrigerator for a cold proof of 12-18 hours. This long, cold ferment is where the magic happens and the signature tang develops.
- Preheat & Bake: Place a Dutch oven with its lid on into your oven. Preheat the oven to 260°C for a full hour. Once preheated, carefully remove the hot Dutch oven from the oven. Take your dough straight from the fridge and gently invert it onto a piece of parchment paper. Score the top of the loaf with a sharp blade or razor to allow it to expand. A simple slash or a cross works perfectly.
- The Bake: Carefully lower the parchment paper with your dough into the hot Dutch oven. Put the lid on and return it to the oven. Immediately reduce the oven temperature to 230°C. Bake for 20 minutes with the lid on (this traps steam, creating a crispy crust). After 20 minutes, remove the lid. The loaf will look pale but puffed. Continue baking for another 20-25 minutes, or until the crust is a deep, dark golden brown and an instant-read thermometer inserted into the center reads 98°C.
- Cooling (The Hardest Part!): Carefully remove the loaf from the Dutch oven and place it on a wire rack. You must let the bread cool completely for at least 2 hours before slicing. Slicing into hot bread will result in a gummy texture as the internal structure is still setting. The sound of the crust crackling as it cools is your reward.
For more recipes, visit www.worldchefs.org/news.